Front End Development: Store Layout Creator
The Store Layout Creator page made up a significant portion of the front-end software development effort. There was a need to create a system by which the user can create a digital representation of a physical space. The format chosen was one that resembles inventory plans that are used in large stores to organize products. Efforts were made to build a system that can be altered dynamically in order to create an accurate and up to date model. In this post, we talk about the development details of the Store Layout Creator.
Use Cases Fulfilled
- 2.1 - Assign location to a microcontroller
- This use case was defined as the need to assign a location to a microcontroller, but ended up evolving to the ability to assign a location to a sensor.
- Assigning a location to a sensor is done by adding the url of a sensor’s datastream to the editable text feilds located within a sections attributes. Too see how to do this, follow the instructions for Using LASS: Store Layout Creator.
- 2.2 - Configure a store layout
- This is the main use case that is accomplished by the Store Layout Creator. Details of its workings are explained in the sections that follow.
- 2.3 - Show map UI
- The map UI that is used for both the Store Layout Creator and the Store Viewer is created in real time while editing the store layout.
Enabling Technologies
To enable the user to build a model dynamically, it was decided that both a visual representation and easy to modify controls were needed. The user interface that was eventually decided upon was uses the bootstrap front end framework for positioning and styling, jQueryUI accordion elements to organize the user’s information, X-editable to allow real-time editing of attributes, and D3.js to visualize the store floorplan. To simplify the JavaScript necessary to merge all of these technologies together, jQuery was utilized.
Store Layout Creator Architecture
Shown below is a screenshot of the system with some shelves and sections added:
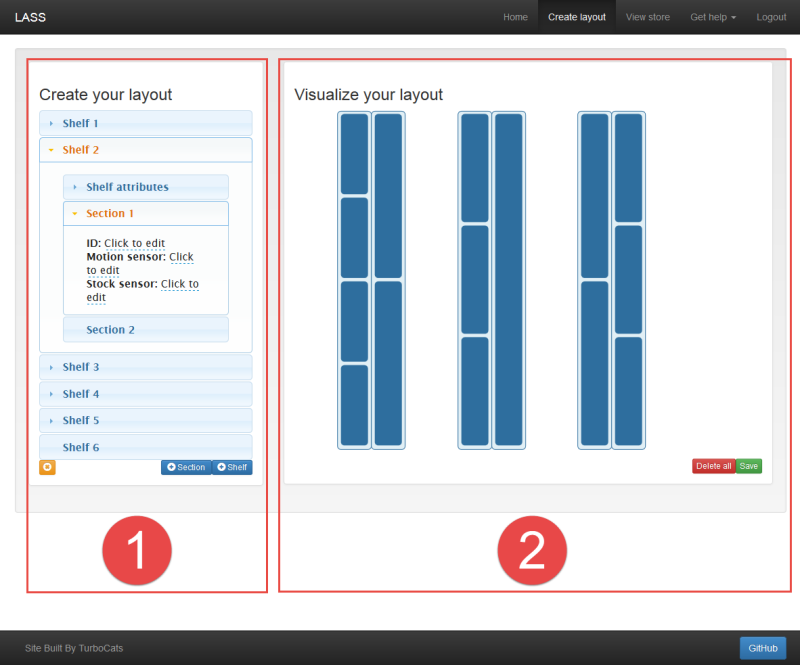
System Overview
As you can see in the screenshot above, the system is split into two distinct panels. When a user wants to create a model of their store, what they are really doing is manipulating a JavaScript object with the controls that have been provided to them. While both the left and right panels are representations of the same object, they present this data in a different way.
The user is given control over the JavaScript object via the controls of the left panel, labelled 1. The elements labelled ‘Shelf 1’, ‘Shelf 2’, etc., are jQueryUI accordion elements. Note that inside of the open element, ‘Shelf 2’, there are a set of nested accordions. These contain the attributes and sections of ‘Shelf 2’. By utilizing the ‘+ Section’, ‘+ Shelf’ and ‘(x)’ (remove) buttons, users can add to the object or remove the selected accordion element. Within each of the nested accordions, editable text fields exist. These allow users to configure the attributes of each part of their model.
The visual representation of this model is shown in the right panel, labelled 2. This is displayed to guide the user’s creation by allowing them to relate what they are building to physical space. The visualization is updated in real time as elements are added and removed. In the screenshot provided, the shelves are represented by the 6 light blue rectangles that contain an assortment of smaller blue rectangles. They are created as from left to right, and are in groups of two to represent two opposing sides of a shelf. Thus, the white space between the shelves represents the concept of an ‘aisle’. The smaller blue rectangles contained within them represent Sections, which can be used to set up logical divisions to differentiate products on a shelf. They are created from top to bottom.
Once the user is happy with the layout of their store, the JavaScript object is converted to JSON and saved to database. Anytime the Store Layout Creator is opened thereafter, the object is loaded and the accordion elements, attributes, and visualization are rendered exactly as they were configured when the user saved. This allows the user to edit their store layout at any time without needing to build a new one from scratch.
Data Structure
An example of the object that is being manipulated and displayed by the user interface is shown below:
shelves = [
    {
        "sections": [
            {
                "displayID":"Dog Food",
                "pirURL":".../Things(1)/Datastreams(1)/Observations",
                "pintURL":".../Things(1)/Datastreams(2)/Observations"
            },
            {
                "displayID":"Cat Food",
                "pirURL":".../Things(2)/Datastreams(3)/Observations",
                "pintURL":".../Things(2)/Datastreams(4)/Observations"
            },
            {
                "displayID":"Bird Seed",
                "pirURL":".../Things(3)/Datastreams(5)/Observations",
                "pintURL":".../Things(3)/Datastreams(6)/Observations"
            }
        ],
        "notes":"Pet Food Shelf"
    },
    {
        "sections": [
            {
                ...
            }
        ]
        "notes":"Some other Shelf"
    }
]
The shelves array holds the shelf objects which, in this example, are comprised of notes which is assigned in the ‘Shelf Attributes’ accordion, and an internal array for sections which holds the section objects. There are three sections in the first shelf, for ‘Dog Food’, ‘Cat Food’ and ‘Bird Seed’. Alongside these attributes is the pirURL and the pintURL. These are the addresses of the observations of the sensors that are contained within those sections. A second shelf exists, with some filler text for its attributes.
Technical Challenges
This section details some of the challenges encountered in building the Store Layout Creator. It serves to explain the inner workings of the system to guide anyone that wishes to use or modify our code.
Nested Accordions
jQueryUI accordions are based off of pre-defined html structures which are converted to an accordion once the accordion events are attached to them. In order to facilitate this in an on-the-fly manner, the first step was to create a template of an accordion and house it in the HTML document for the page. We also need a ‘parent’ accordion for all of the new accordion elements to be added to. These can be seen below:
<!-- Parent for all accordions -->
<div id='parentAccordion'></div>

<!-- Template for accordions -->
<div class='accordion'>
    <h3 class='accordion-title'></h3>
    <div class='accordion-content'></div>
</div>
Then, the accordion events must be attached to #parentAccordion. The options available are defined in the documentation.
var accordionConfig = { ...options... };
var $parentAccordion = $("#parentAccordion");
$parentAccordion.accordion(accordionConfig);
With our accordion template defined, we can clone each time a new accordion is needed.
var $newAccordion = $('.accordion').children().clone();
Each of these clones will require the accordion events to be attached to them, just like #parentAccordion.
$newAccordion.accordion(accordionConfig);
Then we append them to #parentAccordion.
$parentAccordion.append($newAccordion);
$parentAccordion.accordion("refresh");
The accordion elements are created with the following:
- The header (title bar) with
id="#ui-accordion-parentAccordion-header-" + n - The panel (body) with
id="#ui-accordion-parentAccordion-panel-" + n
Where n is the nth element in the accordion.
Utilizing these selectors, you can change the title and body contents. Additionally, by selecting the body of an accordion, you can attach a nested accordion by following the steps described above.
Removing Shelves and Sections
In order to remove the active shelf or section, functionality to remove elements from the accordion as well as the d3.js visualization was needed. It is trivial to remove an element from the shelves array using .splice(n,1) but some additional work must be done to update the accordion and d3 SVG elements.
Removing accordion elements
Since we extended the abilities of the jQueryUI accordion to allow it to be used in a dynamic way, it follows that it does not have built in functionality to remove elements from a dynamic accordion. Problems arise when removing elements from the accordion because of the way they are assigned ids. It becomes necessary to reassign existing ids once elements are removed to re-instate a 0-n order without gaps.
For example, if shelves array has 5 elements, and you remove element 3, the remaining elements would have headers labelled id="#ui-accordion-parentAccordion-header-" + n, where n = 0,1,3,4. Then, because of the gap in numbering, trying to add a new element will cause the accordion to behave undesirably.
The approach that we took to do enable deleting for the accordion element is as follows:
First we remove the accordion header and panel from the accordion.
var header = "ui-accordion-parentAccordion-header-";
var panel = "ui-accordion-parentAccordion-panel-";

$("#" + panel + activeSectionNumber).remove();
$("#" + header + activeSectionNumber).remove();
Then we rename the ids of the remaining accordion elements.
$("#parentAccordion > h3").each(function (i) {
    $(this).attr("id", header + i);
    var n = i + 1;
    $(this).text("Shelf " + n);
});
$("#parentAccordion > div").each(function (i) {
    $(this).attr("id", panel + i);
});
Then we must also dive one level deeper and rename the ids of any child accordion elements.
for( var i = 0; i < shelves.length; i++){
    var panelSelect = "#ui-accordion-parentAccordion-panel-" + i;
    var childHeader = "ui-accordion-ui-accordion-parentAccordion-panel-" + i + "-header-";
    var childPanel = "ui-accordion-ui-accordion-parentAccordion-panel-" + i + "-panel-";
    $(panelSelect + " h3").each(function (j) {
        $(this).attr("id", childHeader + j);
    });
    $(panelSelect + " div").each(function (k) {
        $(this).attr("id", childPanel + k);
    });
}
Removing SVG elements
While d3 does allow for the removal of elements dynamically using the .exit() function, the perceived gain in retaining all of the relationships between the visualization and the shelves array was low compared to the work required. Due to time constraints, it was decided that when an element is removed, that the visualization is redrawn similar to what happens on the initial loading of an existing configuration of the system. Being as the user’s focus will likely be on the accordion elements during removal, this undesirable characteristic was decided to be okay for the first version of LASS.
Saving and loading editable attributes
Enabling editable attributes was done using the X-editable JavaScript plugin. This allows the text the user enters to modify the shelves array. Each time a new field is added to an accordion panel, it needs to be made editable. This is done by checking which new fields exist and adding the editable events to them. An example for a field of class motion is shown below:
$(".motion").not(".editable").editable({
    ... options ...
});
The options that need to be defined to allow the manipulation of the shelves object are as follows:
defaultValue : pirURL,
success : function(response, newValue){
    pirURL = newValue;
},
display: function(value){
    if ( pirURL == undefined ){
        $(this).text("Click to edit");
    } else {
        $(this).text(pirURL);
    }
}
Where:
defaultValueis what appears in the editable boxsuccessis what to do when the user enters a valuedisplayis what to display when the editable feild is created
d3.js
Apart from the seemingly steep learning curve of d3.js, there were no additional factors that added to the difficulty of creating the visualization tab. All of the functionality implemented works in a standard way.
