Development Process: Technical Deliverables and Progress Report
For the third and final part in this series, I’ll focus on discussing the progress the LASS project made up until December 2013, which was the mark of the 75% point of our project. In particular, some of the milestones we acheived were defining the use-cases for our future software / prototype development, discussed which sensors we would eventually use, and likewise identified some of the potential risks we might face as we moved forward in the project.
Technical Deliverables and Progress Report
Unlike previous milestones throughout our project, the technical deliverables report provided more of a progress summary of work done until the point it was submitted. The majority of the first four months of development was planning and research into the methods required to make the LASS project come to fruition. In particular, with the definition of the Use Cases and potential risks, we set out the framework which helped direct how we intended to develop the rest of the project. The two months after focused largely on implementing technical detail that can be better described in other posts.
Use Cases
With regards to engineering and software development, use cases are a way of defining the input and output relationships between actors and elements within a system. Typically, use-cases are written in the form of tables, with one table per each use case. However, as the number of use-cases for our project is greater than just a few, we felt that it would be best to leave the full use-case descriptions in the original technical deliverables report, as opposed to copying them here. This is mostly because of the quantity of space it would take to present them would crowd out the rest of the discussion for this article. Alternatively, if you don’t want to read the full report, but would still like to view the fleshed-out use-cases, you can always check the original wiki page located here.
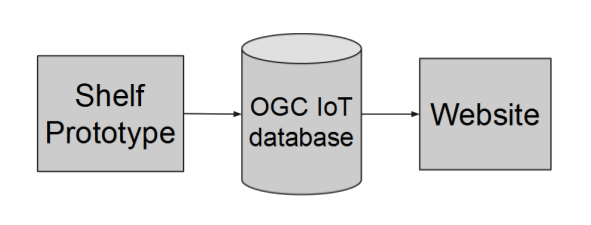
By this part of the project the group had split up in order to tackle the two major components of the project: Developing the sensor prototype, and developing the corresponding website. Working in separate parts, our group came up with two sets of use cases that we would define so as to interact with the overall model of the proposed system, shown below:

From this, we had the prototype use-cases focus on the following use cases, which would ultimately upload data to the OGC SensorThings API (also known as OGC IoT database above).

To briefly explain, we needed to create a specific set of functions and classes that would be able to take interactions from our actors (the Raspberry Pi and the sensors), and subsequently format that data appropriately and upload using the SensorThings API. The specifics as to how we implemented these use cases can be found in other sections, so I will spare you the details here.
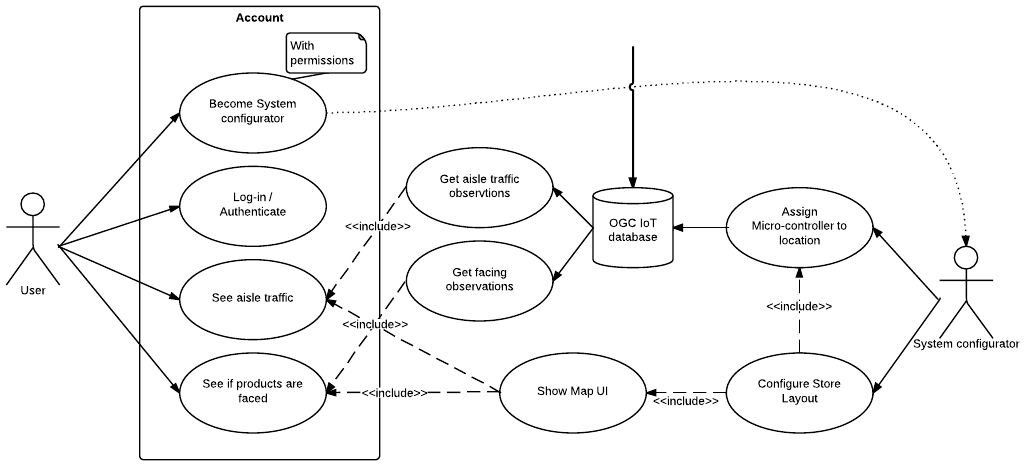
The use cases for the website were similar in how we modeled them; however, the actors and their interactions were quite different and in some ways more extensive. Thus we came up with the following use-case diagram below:

The primary interactions in the diagram above are our actors (users of the service) interacting with elements on the website. In particular, we specified that our system should have some kind of authentication functionality, as seen inside the boxed area on the left of the diagram. This would allow users to authenticate themselves for their store, and view observations for their store in real time. If users were promoted to “system configurator” status, then they would be allowed to create their own map of their store, as well as assign specific actors from the prototype diagram to locations within their store.
It is important to note the separation of both sides of development, in that the only real dependency between the two sides was the OGC IoT database. This is what allowed our team to split our efforts and have more effective concurrent development. This flexibility helped greatly with developing our final application, as we could decouple development of each of our components from one another. In plain English, this effectively meant that we didn’t need either side to be finished or working in order to test or debug the other half of the project. Because the SensorThings API allowed us to easily read and update the data on the server, we would be able to push development forward even if we had to simulate data.
Sensors used
While the technical deliverables report had initially stated that we had determined which sensors we would use and how we would use them, we later found that some of our original ideas would not work so well in practice, particularly due to interference and cost. So while the discussion below doesn’t fully match that of our original report, a list of each of the sensors we used for our purposes is described.
Passive or Pseudo-Infrared Sensor (PIR Sensor)
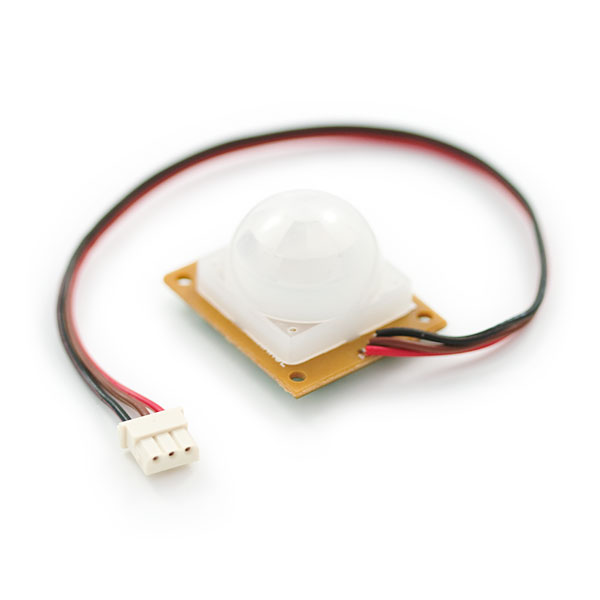
A pseudo-infrared sensor, also referred to as a PIR sensor, is a small, round sensor that measures infrared light radiating from objects within view of the sensor. These types of sensors are often used in motion detectors. A common example of these in use can be seen in the automatic taps and soap dispensers in washrooms. Our aim was to integrate these sensors within a shelf in a store, and track customers throughout the store by mapping the trail of activated motion. The specific brand of PIR sensors we used can be found on sparkfun.com. See the image below:

Photo-Interrupter
Initially, we had proposed to check the stock of any particular shelf using magnetometers attached to self-facing shelf units. We envisioned a system that would change the readings on the magnetometer based on the distance that the self-facing unit would have from a “full” position or an “empty” position. This would allow us to know how much stock was available based on the position of the self-facing unit (full or empty or neither).
However, we found a much simpler solution that would not only be cheaper to implement (with respect to raw sensors), but would likewise not require that our shelf-units be self-facing. The solution we discovered was to use photo-interrupter sensors.

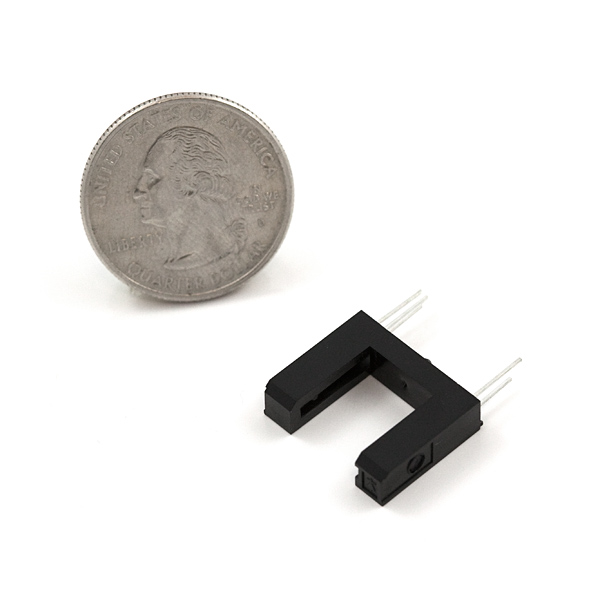
The photo-interrupter shown above can likewise be found on sparkfun.com. The photo-interrupter works quite simply, in that it produces a true or false value depending on if you block the beam of light between the two bars (shown in the black part of the U shaped device above). In this way, if we separated the two bars by a greater distance, we could place one on each end of a shelf-unit and it would be possible to determine if a shelf had stock or not based on whether the beam was blocked.
Risks Identified
The major risks we identified for the project at this point in time are listed below. Naturally, this was only the first evaluation of our potential risks within the project, so what’s listed below is not a full evaluation of all the risks our project entailed. In a later post I hope to describe what we could have, or rather should have done differently in order to more rapidly and accurately identify and mitigate risks within the project.
- We were concerned that we would not be able to acquire our sensors in time, as we had believed that shipping times might pose a liability. Of course, this would not necessarily impede the progress of the website development, but could pose issues for finishing the prototype development.
- We felt that there was a chance that we might have ran the risk of developing the two sides of the project orthogonally to one another if we did not have strict adherence to the use cases. Fortunately our use-cases were well thought out at the time of writing, so we eventually found this to not be as big of an issue as we might have originally anticipated.
- While we did do some cost analysis regarding the sensors, we didn’t do an extensive study into what the typical cost might be for the end-product we wished to develop. Naturally, the cost of the sensors, while cheap, grows as more sensors are needed. However, we never identified the full cost per unit at that point in time, and ran the risk of having a project that others wouldn’t try to use or develop off of if the cost of development caused a significant barrier to entry.
- The group had concerns that when the sensors did ship, they might not function as expected, or they might be too sensitive to changes in the environment. For this reason, we felt that a certain amount of time would be required in order to properly calibrate these sensors properly.
- Implementing the user system as described in the use case proved to be challenging, so we did potentially risk not having a fully fleshed out user system as described above. In the end, we found that adding user-tiers (regular user vs. system configurator) was too challenging and did not really add a significant return for the investment. Put plainly, even if we had different levels for users, the overall functionality of the project as a whole would not change. Additionally, as one of the objectives of our project was to help provide an example to help proliferate the OGC SensorThings API, the loss incurred by not implementing such a system would not significantly affect the outcome of this goal.
- One of the most significant problems that we could rarely test was transferring large amounts of data to and from the SensorThings API server. When we initially started using the test server provided for us, we found that it reset itself quite frequently, which prevented us from being able to scale the project up to many sensors and observations. In the end, some specific limitations of the server were discovered, namely that it doesn’t properly return
last-modifiedfields in the HTTP headers, which created a huge inefficiency everytime we tried to download and test data (since we couldn’t properly obtain HTTP 304 response codes). There were some other minor issues, but those will be the focus of another post. After identifying these issues and bringing them up with our supervisor, we managed to mitigate the largest challenges and still ship a working prototype of the entire system.
As always, feel free to read the full report(s) on Github {1}{2}.
Previous Post: Development Process: Literature Review
